Hi, why there isn’t an option to double up the bearer when creating the subfloor?
It would be great to specify stumps and footings in the floor joist tool also. Just to quickly create a conventional subfloor.
Thanks mate,
James
Hi, why there isn’t an option to double up the bearer when creating the subfloor?
It would be great to specify stumps and footings in the floor joist tool also. Just to quickly create a conventional subfloor.
Thanks mate,
James
Hi James,
Thank you for the suggestions, I’ll take them back to the development team for further discussion. In meantime, here are some options to achieve the results you’re after.
Doubling Up Bearers
To double up the bearers, I would recommend manually duplicating them within the floor joist group using the copy-move feature of SketchUp. The steps below show the easiest way to do this. Note: This is what we call a manual change. Any manual change will be reverted if the geometry in the group is adjusted using a PlusSpec tool, so only make these changes at the end.
Creating Stumps & Footings
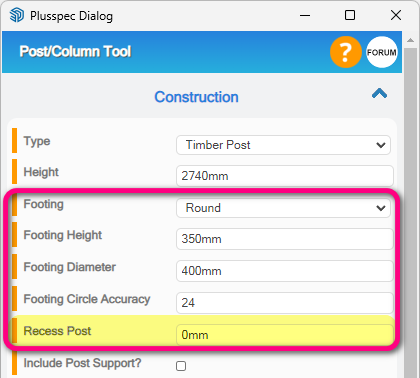
The best way to create stumps & footings is by using the ![]() Post/Column Tool & enabling footings (shown in the image below). The benefit of this method is that you can place the stumps & footings wherever they’re needed & can make more specific changes to each stump/footing easier (e.g. if it’s on a sloping site). The steps below show the best way to do this.
Post/Column Tool & enabling footings (shown in the image below). The benefit of this method is that you can place the stumps & footings wherever they’re needed & can make more specific changes to each stump/footing easier (e.g. if it’s on a sloping site). The steps below show the best way to do this.

IMPORTANT NOTE: Make sure the floor joist are drawn first & are at the correct (position, sizes, etc.) before starting these steps as it’ll save you time.
When the SketchUp Move Tool copy-move feature has been activated (by pressing Ctrl), there are two ways to place multiple instances (or an array) of the object.
After placing the first instance of the copied object (i.e. clicking a point in the model to place the object OR entering a length/distance & pressing Enter):
Thanks,
That is what I did for accuracy of the drawing. I am still not sure if this will be correctly quantified in the materials take-off though.
Regards,
James
Hi James,
The takeoff will always use the geometry the material is applied to in the model when estimating materials (components work a little differently), so as long as the posts are drawn correctly (height & other sizes specified) then the takeoff should be correct. The quantity of each post will also just be the number of instances in the model.
You can also change where material items appear in the takeoff via the Edit Tag & BOQ Category button located under each material field (shown in the image below). The parts labelled A & B in the image have been explained below.
Tip: Use the Custom tickbox in either section to write in your own values.
Note: Click the Revert button to change the values back to the default setting for the selected material.
James, to ensure certainty with the takeoff, select the item in question and right-click> Takeoff selection only.
This way, you can see the BOM without other items. James, please post these yourself instead of having the admin do it.
@SaraAdmin24, please send users a link or encourage them to click instead of posting it for them. Our time can be used more efficiently.

@Andrew, do you have any additional feedback about doubling bearers?
I’ve built plenty of homes and i have not doubled bearers (girders) so it would be good to understand the usercase before putting this into development.
In saying that i have ordered 150x70 (3x6)and it was out of stock and i used two 150x35 (1.5"x6". This was an osolated instances DVD in this case i suggest adding a recipe on the BOQ and excluding the 150x70. This way the BOQ will be correct.