how do i add noggings to wall frames?
Hey Les,
Thank you for posting to the forum.
To add noggings you will need to tick the check box “Include Nogging” in the framing section of the Wall Tool, then you will be able to specify your spacings.
Note: You will need to select a wall type that has framing in it, example single masonry wall type this option won’t come up.
when i draw this frame no noggings are drawn i have selected noggings at 1350 crs
this image is as the walls are drawn the noggings should be at 1350 crs i have drawn the noggings in using the beam tool as shown in the second image
how do i associate the beams (noggings) drawn with the panel
Hi Les,
I’m not able to replicate the issue you’ve raised & the workflow Tyler mentioned should’ve worked. I’ve also looked through the model you sent to us but I need more info to be able to see what’s happening & how you got this result. After drawing the wall(s), what other changes have you/do you make (e.g. Do you make changes using Adv. Framing Options? Do you add junctions? etc.)?
If you want to add any object to a wall (beams, noggins, etc. included), select both the wall & the object you want to add to it then right-click on the wall & select + WALLS > + Objects To Walls > Add Object to Wall.
Tip: If you’re adding a beam from the Beam Tool make sure to select the correct Takeoff Tag so it appears correctly in the takeoff.
Hi Grant
When i draw this frame with noggings set at 1350 no noggings appear so i have added them using the beam tool and associated them with the wall but they do not appear on the layouts.
Hi Les, are you using the latest version?
- Right-click the wall > Shift and right-click the beam or nog.
- Choose + WALLS
3.+ Objects to wall
and click add object to wall
Les, are your nogs not showing up on other walls or just on the gable wall?
Check you are not drawing in centimeters or metres. You can do this by typing in 1350mm in the nog area.
Plusspec will choose the default units according to the Sketchup template you open, yet you can override this in the settings.
V25.0.0 is my latest version
Walls 14 17 18 19 21 22 23 31 32 33 34 35 36 39 40 56 (59 not Right)
Okay I see. So all but one wall has nogs.
Im not sure why will look at it. In the interim use the beam tool as you are and add object to wall.
The model looks neat so good job mate. Make sure you take some pictures onsite age share them. They also look good on your website.
Hi Les,
This is because the Frame Panelization Tool is set up to only show framing geometry that’s specific to each wall. Since you’ve used the
Beam Tool to add the additional members they are likely on a tag/layer that’s not visible. If you follow the steps below it should fix the issue you’re having.
- Select a scene (e.g. W24).
- Go to the Tags section of your Default Tray.
- Turn on the tags/layers needed for the current scene (in this instance turn on ‘17_BEAMS/PLATES’ & ‘BEAMS_GROUP’).
- Right-click on the current scene & select Update.
- Repeat Steps 1-4 for each scene that has missing geometry.
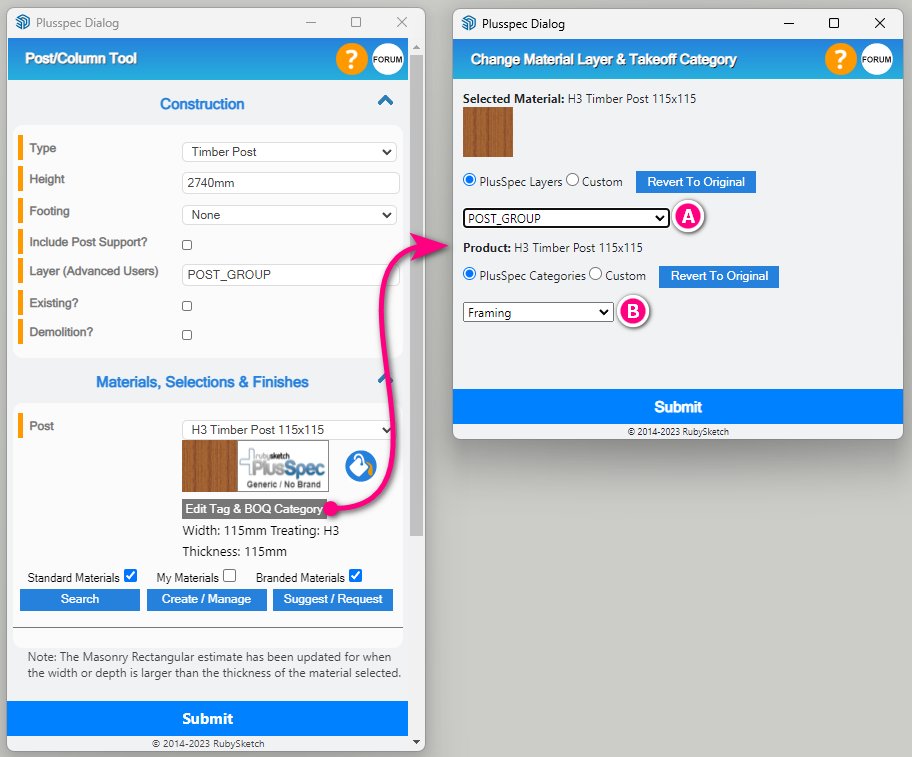
Changing Tags/Layers & Takeoff Categories of Materials
Throughout the software, the selected material sets the tag/layer assigned to the geometry. This can be adjusted via the Edit Tag & BOQ Category button below each materials field so that the materials/objects appear in the model & takeoff where you need it. The link below is to a post that explains this feature in more detail.
Yes, the only time this can be incorrect is if you scale a material using the SketchUp scale tool.
Why? Because materials are like balloons. You can stretch a balloon from 20cm to 40cm, yet it’s still one balloon.
In a few cases, if you alter geometry using the Sketchup scale tool instead of push-pull or the parametric functionality of plusSpec, you may find you have incorrect measures. This does not happen in all cases, yet the rule of thumb should be don’t use the Scale tool, as it is bad practice.
I hope that helps