Hi everyone,
Thank you for the great suggestions Mitch. We love seeing our community helping each other out! ![]()
Regarding you original post @Gareth, another option to achieve the result you’re after would be to use the ![]() Custom Estimation Tool to apply an estimating material to the excavation geometry you’ve drawn in your model. If done correctly, the excavation amount should then appear in the takeoff so a price can be added, items can be linked with it & more. Note: If there are any materials missing from the Search Results you can create your own via this dialog (see steps outlined below).
Custom Estimation Tool to apply an estimating material to the excavation geometry you’ve drawn in your model. If done correctly, the excavation amount should then appear in the takeoff so a price can be added, items can be linked with it & more. Note: If there are any materials missing from the Search Results you can create your own via this dialog (see steps outlined below).
Steps
- Select the Unit of the desired material.
- Enter text into the Search Products field &/or select an option from the Search Category dropdown field. Note: This step can be skipped if you like.
- Select a material from the Search Results. Tip: To help save time, select a material that has similar info (i.e. texture image, category, etc.) to the material you want to create.
- Click the Create Similar Product To Current Selection button below the material (this will appear above the Search Results).
- Create a material by following the steps as you normally would.
- Use the
 Sync Tool to get the changes (the drag & drop feature isn’t enabled for this dialog).
Tip: The tag or category of any material in this dialog can be adjusted via the Edit Tag & BOQ Category button below the selected material.
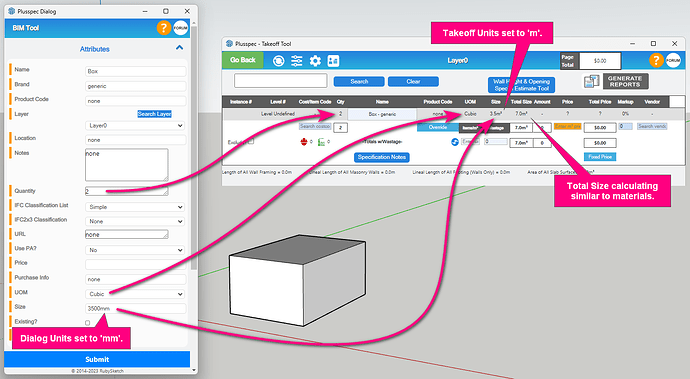
Regarding the ![]() BIM Tool, it’s purpose is to add estimation info to non-PlusSpec geometry in the model so that the item can be quantified in the takeoff. It’s main use is to add this info to components like appliances, fixtures, furniture etc. but it can also be used to add this info to other geometry in the model like posts, beams, fences, etc. that currently aren’t included in PlusSpec.
BIM Tool, it’s purpose is to add estimation info to non-PlusSpec geometry in the model so that the item can be quantified in the takeoff. It’s main use is to add this info to components like appliances, fixtures, furniture etc. but it can also be used to add this info to other geometry in the model like posts, beams, fences, etc. that currently aren’t included in PlusSpec.
The Size field allows you to add a length, area or cubic value of the item regardless of the actual shape &/or size of the geometry this info is applied to in the model. Then, as long as Each isn’t selected for the UOM field, the value entered should appear in the Size column of the takeoff. Tip: Using the Quantity, Size & UOM fields together will make the item behave similar to a material within the takeoff (e.g. prices will work with sizes & not per instance, recipes can be linked with this size values, etc.).
Hopefully that all makes sense & helps answer your questions, but if not please don’t hesitate to reach out. ![]()
