I have a precast concrete wall that sits on the footing, but I have doors (exterior doors and garage doors) through the wall sits at finish floor 12" above the footing. Is there away to adjust the door sill height to 12" above the bottom of the wall?
Hi Steve_G,
There currently isn’t a way to vertically adjust the door position, however there are two methods which should give you the result you’re after.
METHOD 1: (recommended) Creating a “none” window opening at the desired position & placing a custom door in the opening. This can be done by following the steps below.
Method 1 Steps
- Open the
 Window Tool as you normally would to add a window in a wall.
 - Select the None option & change the Height to be the desired door height.
- Draw the opening in the wall at the desired width. Note: Use the
 Redefine Opening Tool to adjust the position or parameters of the opening if it’s not correct.
 - Open the
 Custom Door Tool & select the door you want to use.
 - Draw the door in the model at the opening created. Note: To adjust the door width the door will need to be deleted & redrawn, so it’s recommended to trace the opening width created in Step 3 to reduce the chances of this happening.
- Use the SketchUp Move Tool to move the door into the correct position (if needed).
METHOD 2: Creating two separate walls stacked on top of each other & adding a door to the upper wall. This can be done by following the steps below.
Method 2 Steps
- Draw the first wall with the height at the desired door sill height (i.e. wall height = 12") & the footing enabled. Note: If the wall is already created, just adjust the height.
- On top of the previous wall, draw the second wall with a height at the remaining wall height (i.e. wall height = 12" less than the original total wall height) & the footing disabled.
- Add the desired door to the upper wall using the
 Door Tool as normal.
Great ideas. Thanks!
Hi @Steve_G, did we meet at Basecamp in Vegas? I just got back to Australia.
Questions:
- What is the desired outcome of the 3D model?
- Is it for 2D documentation/authority (council) approval?
- Is the 3D model for setting out the tilt panels on the slab onsite?
- Are you building the tilt panels in a factory and looking for a stacking order?
- Are you looking to estimate and order materials and labour from the 3D model?
I agree with @Grant. Option 1 is technically correct, yet Option 2 is faster. We have been asked this question before, so we will consider adding the option to lift doors in the solid wall and the single masonry wall tools.
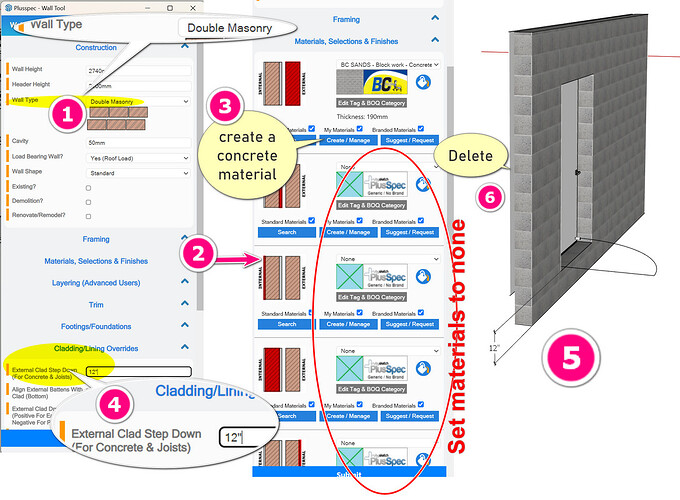
My option 3
- Use double masonry wall
- Click the arrow next to Materials, Selections & Finishes
- Create a concrete material & choose “none” in everything other than the external Skin
- In the Cladding/Lining Overrides section, type in the desired set down for the base of the concrete wall
- Draw the wall on your finished floor level; the external skin will drop down to your footing.
- Plusspec will draw a placeholder for the internal masonry skin, which can be deleted upon completion.
NOTE:
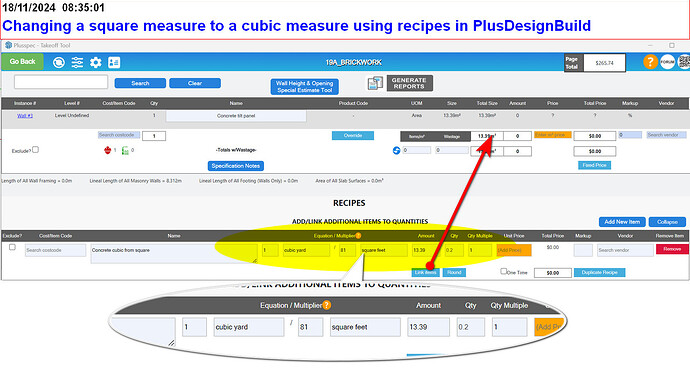
A. Your BOQ will be correct, yet to quantify the concrete in cubic, you must change the area measured to cubic in a recipe. E.g. 81 square feet of concrete that is 4" thick, will be 1 cubic yard of concrete.

