Sketchup pro 23
PC: Windows 11
PlusSpec version is: PlusArchitect
Hi, I am a building designer. I am designing new homes and extensions for private clients, and I could use a few tips on creating 2D plans and elevations for council approval in New South Wales.
Issue 1.
My Elevations and scenes are not in the centre of Sketchup. I create scenes early in the design phase as per the tutorial. How do I centre my scenes quickly so my elevation and section look right inside of Sketchup and Layout?
Issue 2. I like my floor plans to be in black and White, yet I like my elevations and sections to be in colour; how do I do this?
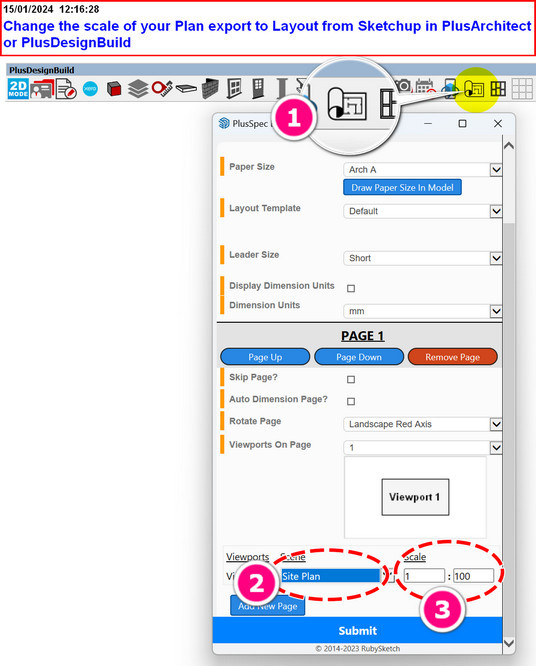
Issue 3. Changing scale when creating my construction documents in Layout. I need my site plans at a different scale to my elevations, and in some cases, I need a custom scale when doing larger acreage properties.
Issue 4. Can I send my model to clients to view with them having Sketchup? I don’t want clients to be able to use the model or make changes.
Regards Sam Laylar, Building Design & Drafting NSW
Ok, so a quick overview: A scene is like a viewport in CAD or in Layout. You can change what you want to show, how it looks and where it is positioned in Sketchup. This includes shadow locations.
To manually centre your model scene by scene you can click Zoom extents inside Sketchup (The keyboard shortcut is SHIFT-S)
2. Right-click on the scene you want to update and select update. Remember to save Sketchup your model: CTRL S
You can update scenes one by one, you can also you can change the styles including line weight profile, line extensions even the colour of your lines Under Styles inside Sketchup
Use the automatic scene generator :scene-gen:
Choose the “Scene/View set” drop-down and depending on what you are drawing you can choose multiple options (if you are unsure,select “All” and delete any scenes you don’t want by right-clicking>Delete It is good to leave framing scenes there as they help you align your walls
You will notice your elevations are now colour and your plans are black and white. You can change your plans to colour if you choose by turning color by layer off. TIP If you notice a heap of black faces in your model, this is due to you having geometry drawn that is untagged (On layer 0 in previous versions of Sketchup). This is a good thing a sit reminds you to keep your geometry organised. If I am in a hurry I simply go to Tags (layers) click on the color swatch next to the tag and edit the opacity to a light grey
Go to Tags
Click on the black square next to the “Untagged” Tag
You can change any viewport scale inside Layout or you can do it before exporting from Sketchup using the "2D construction Doc export Tool inside PlusArchitect or PlusDesignBuild
Yes, PlusArchitect and PlusDeisgnBuild have a 3D model exporter that enables you to send a file to your customer or upload a file to Google Drive, One Drive or similar. The client can open the file in most browsers, including Chrome, Firefox, Internet Explorer or Microsoft Edge. Later-model smartphones with sufficent Ram EG Samasung Galaxy s 21 and Iphones can also open these files.