I have searched and search and can’t find anything on this.
I would like to create a wall system that includes all material on the fly. I would like to use the Eaves as an example. Currently the software will calculate the L\M of fiber cement sheeting, nails and “H” strip (Joiner strip). I would like to create similar for a wall. Example - Clad a wall with 180mm linerboard and automate starter strip, nails & screws required per L\M, Sarking and if possible to recognize internal and external corners and allow stops as required. My next step would be to see if it could automate to allow window trim ect.
Hi Scott, this can be done by creating recipes. The eave items you mention are preloaded examples. Have you watched the tutorial on recipes? Google “Recipes for Beginners in PlusDesignBuild” or copy and paste this link into your browser. https://youtu.be/1EBAbMLufaQ?si=xbGlB4fTGZm6jrYo
I assume you are using PlusDesignBuild?
BTW, “Starter strip” is a material in the wall tool under “lightweight frame with cladding” or “Lightweight multiskin” wall types in the wall tool, so you can simply select a material or create your own. EG James Hardie, Weathertex & BGC all have specific names and Fine line codes and different profiles according to the profile you select. You could make a material and associate the correct starter strip with the correct cladding profile or you could use the rename material option inside the BOQ and simply click on the one you want.
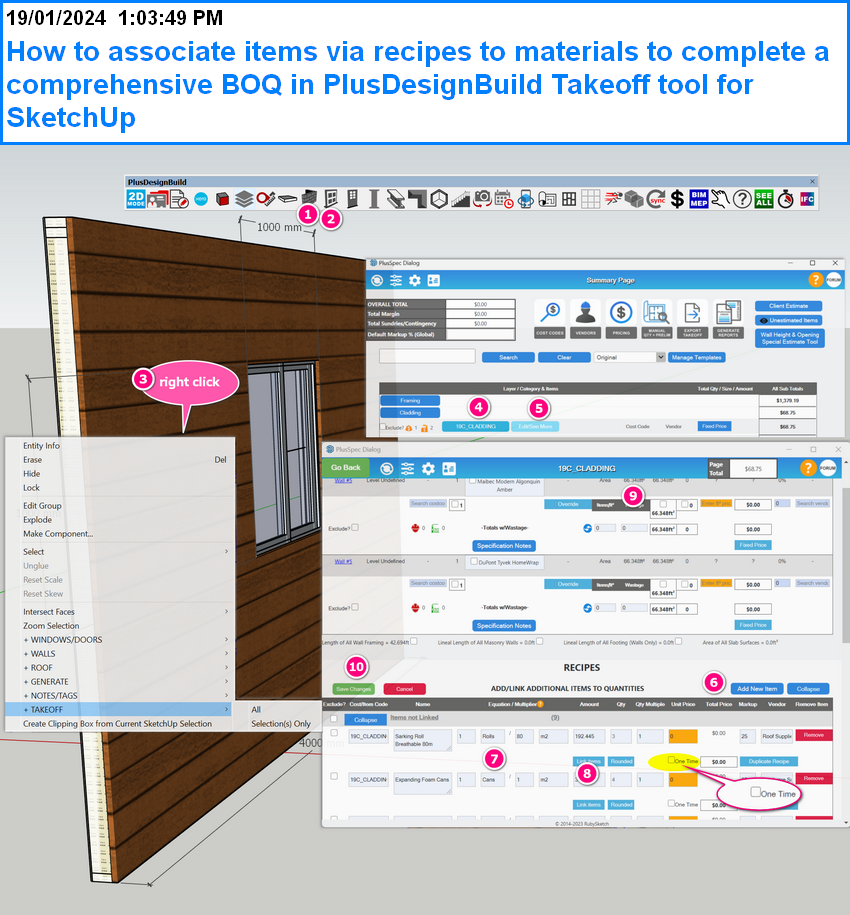
Here is how to associate internal and external corners and window trim to a wall.
:wall-tool: Draw a “lightweight frame with cladding” wall (make it easy round measures like 2.5m high * 4m long so you get 10sqm of cladding; it’s easier to keep your head around and shows how accurate the estimating function is)
:window-tool: Add a 1m x1m window (you’ll now have 9sqm of cladding in the BOQ)
Right-click the wall and select +Takeoff >selection(s) only You could also click the :takeoff: yet this will do a BOQ on the entire model, I suggest takeoff selection when adding recipes as it reduces the noise in the BOQ
Left-click the blue Cladding tab
Left-click the lighter Blue “edit see more” tab You will now notice you have raw quantities according to material genre and type
Scroll down to Recipes and Left-click the Blue " AddNew Item" button a blank recipe will appear at the bottom of your list if you have multiple recipes already created. Note you can edit en existing recipe or delete recipes that ar enot applicable to your business.
Type in the material name and number of items Eg 10, 8G Gal Nails / 1sqm of linerboard (NOTE it is a good idea to associate suppliers and cost codes now as it helps organise your estimates and purchase orders down the track)
Click the blue tab “Link items”
Scroll up to the material you want to link the items with. Note you will notice a tick box has appeared next to the Material name, Click the measure in which you wish to link to your recipe and clcik the green save Changes button. In this case, you would link to SQM of linerboard. However, you could link to the Amount (if you have selected SQM/item) and below that, you will notice you can also associate the items with the lineal measure of the wall genre or even the area of concrete
This recipe will be remembered every time you use that cladding type. NOTE you could make several recipes and simply use the recipe genre as a tick box to help you remember to add certain types of auxiliary items. An example may be in fire zones BAL 40 or BAL FZ, where you need stainless steel perp vents inside weep holes
Sometimes, you may have a project-specific special item, and it’ll be unlikely you will ever use it again. In this case, tick the “One Time” box. The reason you would do this is to reduce the amount of recipes you have that are redundant in the future
To add external corner, stop ends and window surrounds to your takeoff:
Right-click the wall and select +Takeoff >selection(s)
Left-click the blue Cladding tab
Left-click the lighter Blue “edit see more” tab
Click the blue “wall Height and opening special estimate” button at the top (next to generate reports)
You can now add in a value or a product-specific name for window width, wall height stop end, and external and internal corners. Note these will also be remembered for next time.
NOTE: Most miss that you can actually just associate a recipe with the length of all framed walls and all masonry walls; however, in your case, if you are using multiple cladding types with different profiles, this is not the option for you.